Transforming CRUD to Event-Driven: Using the Outbox Pattern to Combine Retool, Neon, and Google Functions
In this tutorial, we will demonstrate how to leverage the power of serverless cloud-native services and Diagrid Catalyst to transform a conventional CRUD architecture, complete with a frontend application and a database, into an event-driven system using the outbox pattern.
Bilgin Ibryam
Principal Product Manager
Introduction
The rise of serverless services has transformed the landscape of cloud computing. From serverless functions that handle compute tasks to databases, message brokers, file storage solutions, and even frontend tools, the cloud ecosystem has evolved into a dynamic, interconnected web of distributed services. With this evolution comes the opportunity to reimagine traditional CRUD applications by transforming them into serverless and event-driven systems, taking advantage of the scalability and the flexibility that they offer.
Typically, backend internal apps (e.g. admin panels, CRUD applications, dashboards, etc.) are built on top of data stores, serving as the foundation for managing and accessing day-to-day operational information. A common scenario in such applications involves a frontend application responsible for data input and visualization. However, modern applications require more than just data storage and retrieval. They demand real-time data processing, enrichment, and dynamic interactions with users. This is where the outbox pattern shines, facilitating the evolution of backend systems into agile, event-driven architectures.
In this tutorial, we will demonstrate how to leverage the power of serverless cloud-native services and Diagrid Catalyst to transform a conventional CRUD architecture, complete with a frontend application and a database, into an event-driven system using the outbox pattern.
We will utilize the following set of free tools and services:
- Retool: A frontend tool for crafting user interfaces for internal apps e.g. admin panels, CRUD applications, dashboards, etc.
- Neon: A serverless PostgreSQL compatible database service.
- Google Cloud (GCP) Functions: The FaaS runtime for processing requests and accessing external APIs.
- Spoonacular Food API: A free API for retrieving the best matching recipes given a set of ingredients .
- Diagrid Catalyst: The platform that connects all the services together, acting as a key/value API with outbox and a managed PubSub service, to seamlessly integrate all disparate components. Catalyst offers a set of unified APIs for communication, data and workflow and is powered by open-source Dapr.
Demo application architecture
In the sections that follow, we provide step-by-step instructions on setting up each of these components to create a cohesive, event-driven application architecture.
Demo Scenario
Our demo application, the Recipe Maker, enables users to discover food recipes based on their dietary restrictions and preferences. The user interface consists of three main sections:
-
Recipe Request: Located at the top left, users can make new recipe requests based on their input criteria.
-
Requests: Found at the top right, this table records and displays the user recipe requests.
-
Recipes: At the bottom part of the screen, users can view the recipes that have been returned based on their input criteria.
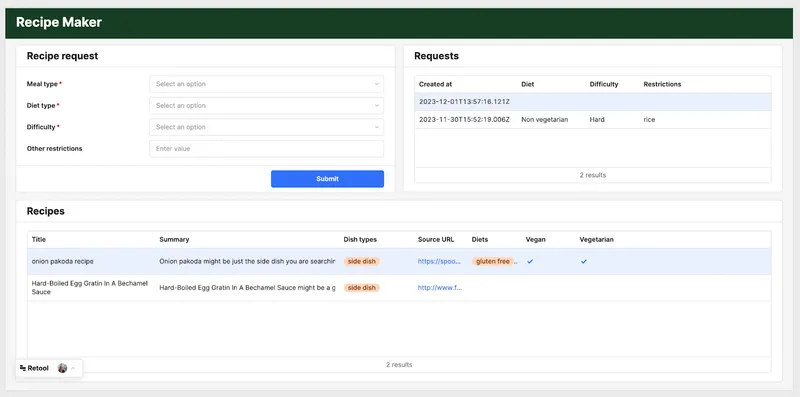
Recipe maker UI
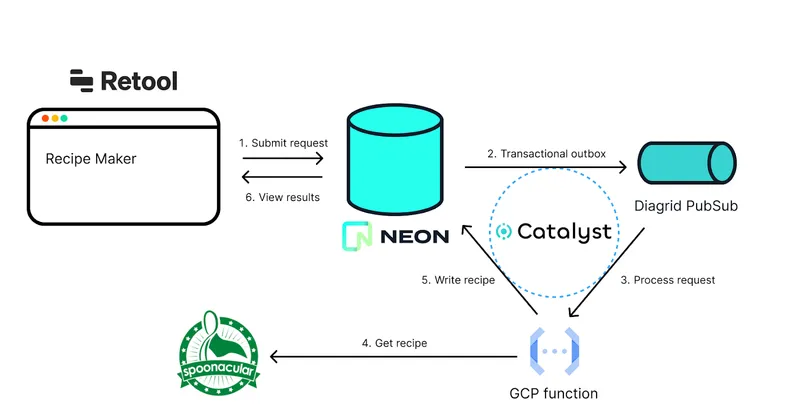
Behind the scenes, Retool leverages the Catalyst Key/Value API to interact with a Neon PostgreSQL database. These APIs handle the persistence of user requests, querying for recipe requests and results, as well as deletion.
The Catalyst APIs act as the glue between Retool and Neon, enabling the outbox pattern by emitting new records into a serverless message broker hosted by Diagrid. Catalyst distributes these recipe request events by making HTTP calls to a Python function running on GCP Cloud Functions. This function, in turn, utilizes the Spoonacular food API to search for recipes matching the specified criteria. If found, the recipes are recorded in the Neon database and visualized in the Recipes section of the Retool UI.
By introducing Catalyst as cloud middleware in this architecture, we extend this basic CRUD application into an event-driven system. This transformation unlocks the benefits of Catalyst's backing services, including the message broker, event delivery to functions, and provides features such as observability, resiliency, and security across these disparate services. Furthermore, it leaves the door open for further extensions and enhancements.
Let's proceed by setting up these services.
Set up a Neon Database
For the infrastructure foundation of our event-driven architecture, we require a key/value store and a message broker. Although Catalyst offers both, in this case, we will utilize the state store from Neon to illustrate how external relational databases can power the Catalyst Key/Value API.
Neon database dashboard
Set up a Neon database as follows:
-
Visit Neon.tech, and register for a free account.
-
Create a Project:
- Login to your account.
- Create a new project.
- Create a Database:
- Inside your project, create a new database.
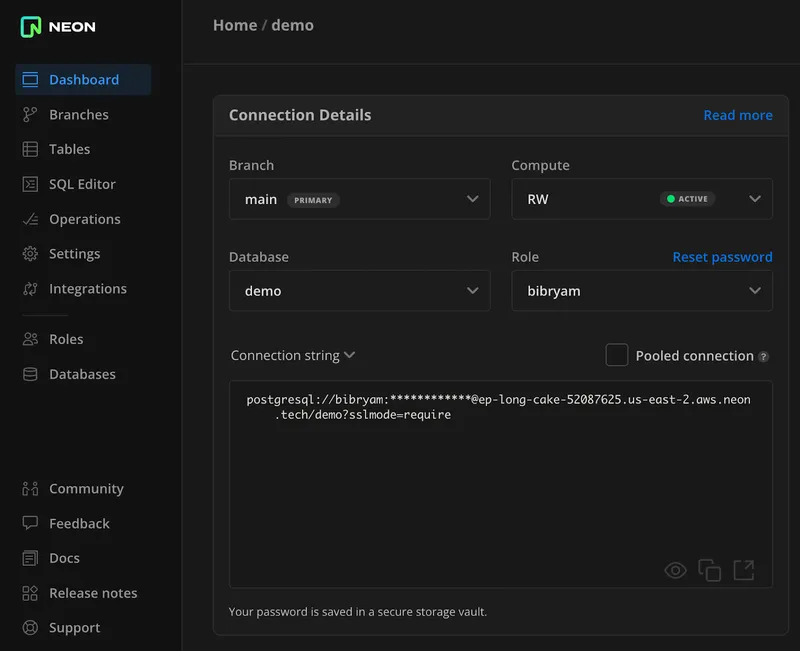
- Retrieve the Connection String:
- After the database is ready, navigate to the Dashboard.
- Copy the Connection String provided. Ensure that you select the Connection String format (rather than the default psql format). We will use this connection string to configure a connection from Catalyst.
Set up Catalyst Connections
To begin working with Catalyst, follow these steps to establish the required connections to backing services.
-
Sign Up for Early Access: Start by signing up for an early access account for Diagrid Catalyst.
-
Create a Project:
- Upon successful registration, login to the console and create a project. During this process, ensure that you enable the Default Pub/Sub Broker option.
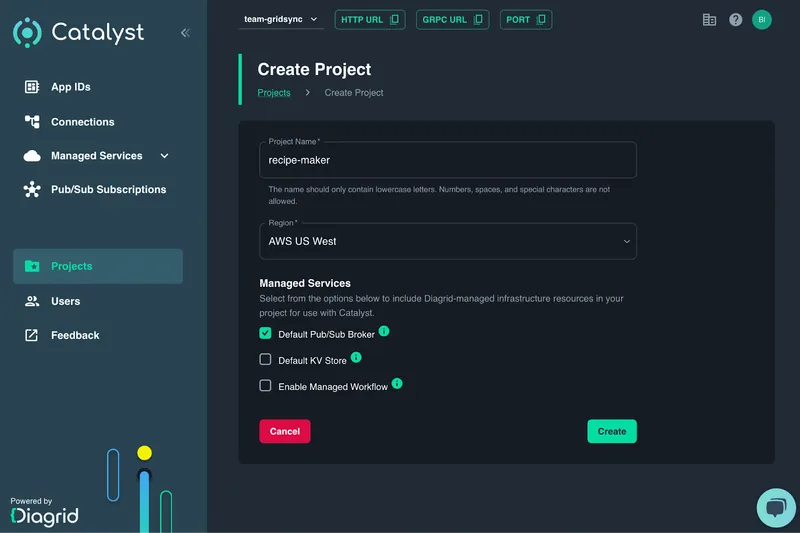
Catalyst project creation overview
Catalyst has the concept of Connections as a higher-level abstraction for the underlying infrastructure including message brokers, data stores, and 3rd party services. By selecting the Connection menu on the left hand side, you will see the Default Pub/Sub Broker appear as a Connection with the name pubsub which we will use later to store outbox events.
- Create a State Connection:
- Click on Create Connection and select the connection type as state.
- Choose the connection type as PostgreSQL.
- Leave the default for Assign access to allow access open to all App IDs.
- Opt for Connection String as the Authentication Profile and paste the connection string that you copied earlier from the Neon dashboard. It should be in the following format: postgresql://username:password@host/database?sslmode=require
- The Connection Name should be database because we will reference it as such from Retool queries.
- Add the following three Optional Configuration Items:
-
- Set keyPrefix to none to allow different App IDs to access the same state. This ensures that different App IDs share the same KV Store without differing database views.
-
- Set outboxPublishPubSub to pubsub enabling the outbox feature, allowing events to be sent to a specific Catalyst pubsub connection when a new state item is created or updated in this state store.
-
- Set outboxPublishTopic to outbox to specify the topic name where outbox events will be sent.
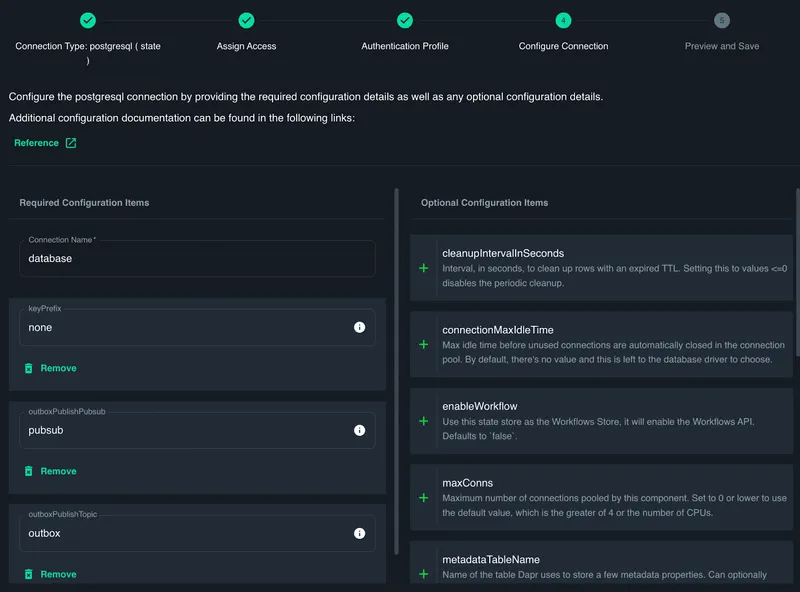
Configuration of a Catalyst connection to a Neon database
Click Continue and Save the configuration steps. After creating the connection, wait until it shows a status of Ready.
Set up Catalyst App IDs
To access Catalyst APIs and leverage backing infrastructure connections and features, we'll utilize the concept of Application Identities (App IDs). App IDs serve as a representation or digital twin of application workloads within the Catalyst platform. They also layer on features like access control mechanisms, infrastructure connections, metrics, and lifecycle management across hosting platforms.
For our Recipe Maker application, we'll create two App IDs: frontend and processor. The frontend App ID will represent the Retool web application, and the processor App ID will represent the Python Google Cloud function that processes outbox events and findsmatching recipes.
Set them up as follows:
- Create App IDs:
- Navigate to the App IDs page on the left-hand side of the Catalyst dashboard.
- Create two App IDs, naming them frontend and processor. Leave all the default options as they are.
- Provision and Verify:
- Once both App IDs are provisioned and have a status of Ready, you can access their details.
- Click on the frontend App ID.
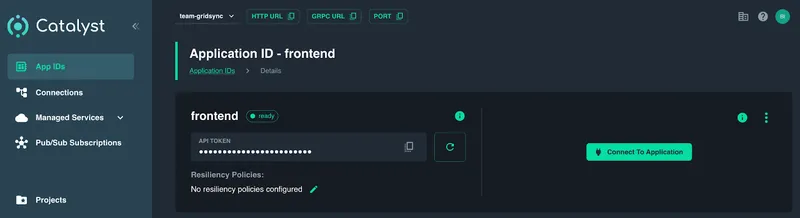
Frontend AppID overview
Copy two crucial pieces of information from this page:
- The HTTP URL at the top, which is shared and remains the same for all App IDs within the Catalyst project.
- The API Token, a unique security token for each App ID.
We will utilize these two values when configuring Retool access in the next step. This setup ensures that our frontend application and the Python function responsible for processing outbox events and finding matching recipes are appropriately represented and controlled within the Catalyst platform.
Set up a UI in Retool
To configure Retool for the Recipe Maker dashboard, follow these steps:
- Sign Up for Retool:
- Sign up for a free Retool account if you haven't already.
- Log in and access your user home screen.
- Create a HTTP API Resource:
- Retool uses the concept of Apps for web applications and Resources for backing services. Create a resource that represents your Catalyst frontend App ID.
- Choose Connect A Resource and select REST API from the list of resource types.
- Name the resource exactly as catalyst_api.
- Set the Base URL value to the HTTP URL copied from your Catalyst frontend App ID.
- Add a new header with the name dapr-api-token and the value copied from your frontend App ID's API Token. The configuration should look as follows.
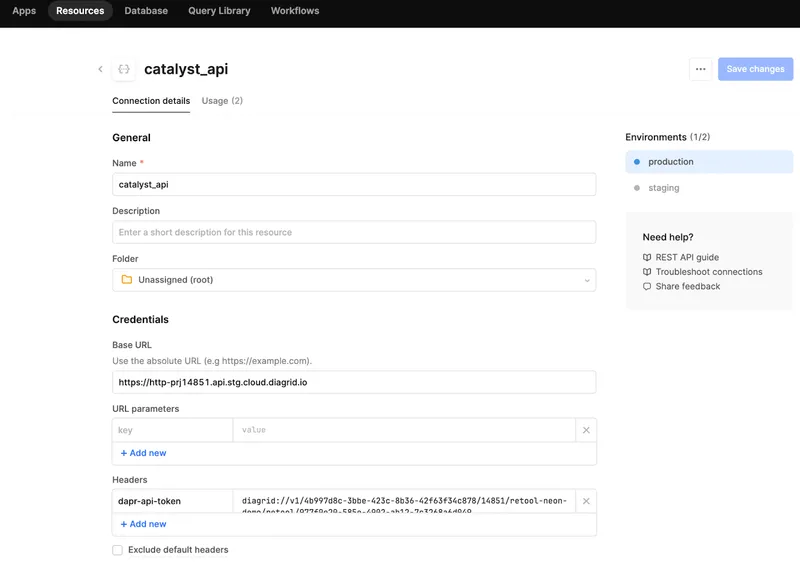
Retool HTTP API resource configuration screen
- Import the Recipe Maker App:
- Clone or download the entire recipe-maker project from GitHub. The Retool application is provided as a single JSON file in the "retool" folder.
- In Retool, click on Create App, and then select the From JSON/ZIP option.
- Locate and upload the recipe-maker.json file from the retool folder of your locally cloned GitHub project.
- Verify Configuration:
- Once your app is created, it will use the Retool resource you created earlier to access Catalyst APIs.
- Test the setup by making a request for a recipe using the UI and check if the requests are recorded in the Requests list. This confirmation ensures that all settings from Retool to Catalyst to Neon are working correctly. You can also view these entries by browsing Neon tables too.
At this point, your Retool configuration is ready to interact with Catalyst and Neon, allowing you to request recipes and record user requests in the database The final goal is to populate the Recipes table in the bottom section of the screen, which will be covered in the next section.
Deploy Python App to GCP Cloud Functions
Now that we have recipe requests stored in our database and events being published to the message broker, it's time to process these events and fetch recipes from the Spoonacular Food API using a Python function deployed to Google Cloud Functions.
Deploy the function as follows:
-
Create a Google Cloud account and login. Create a new Cloud Function and configure the setting in the following steps.
-
Allow Unauthenticated Invocations:
- Ensure that the function is configured to Allow unauthenticated invocations. This setting allows the processor App ID in Catalyst to call this function with outbox events from the internet.
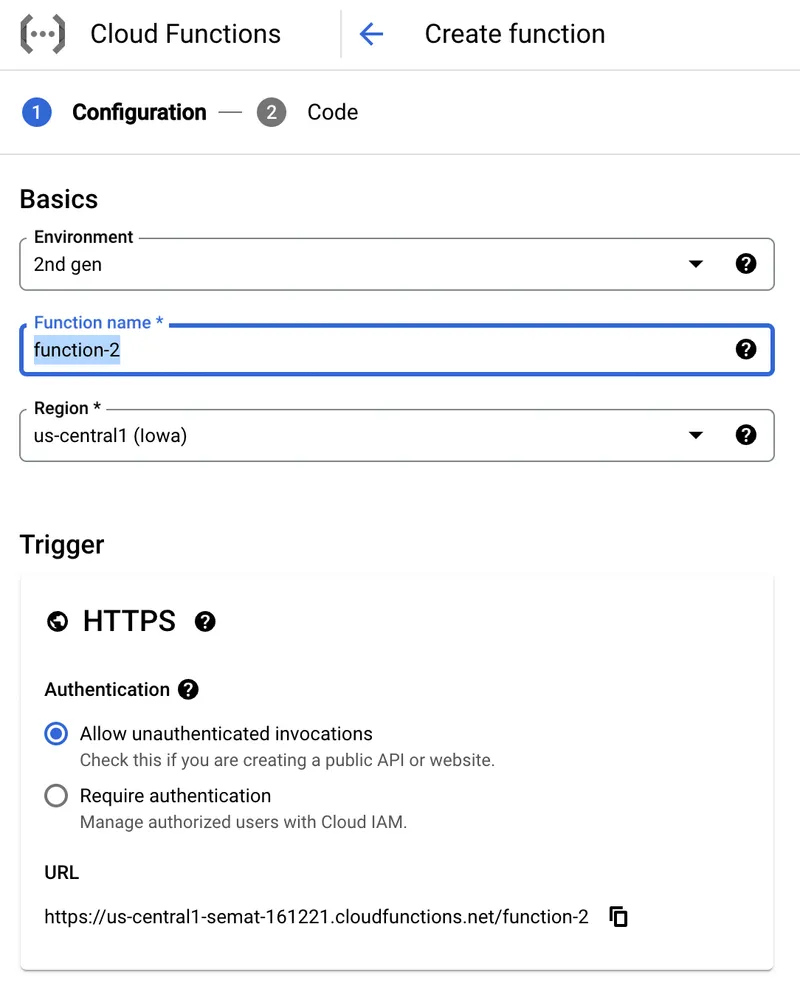
Give public access to Google Functions
- Function Parameters:
- When the function discovers a recipe, it uses the open-source Dapr Python SDK to communicate with the Catalyst Key/Value API and record the recipe in the key/value store. To achieve this, set the following Runtime environment variables :
- DAPR_HTTP_ENDPOINT: Select the processor App ID in the Catalyst console and copy the HTTP URL.
- DAPR_API_TOKEN: Select the processor App ID in the Catalyst console and copy the API TOKEN.
- KVSTORE_NAME: Set it to database as it corresponds to the Catalyst Connection name configured to access Neon.
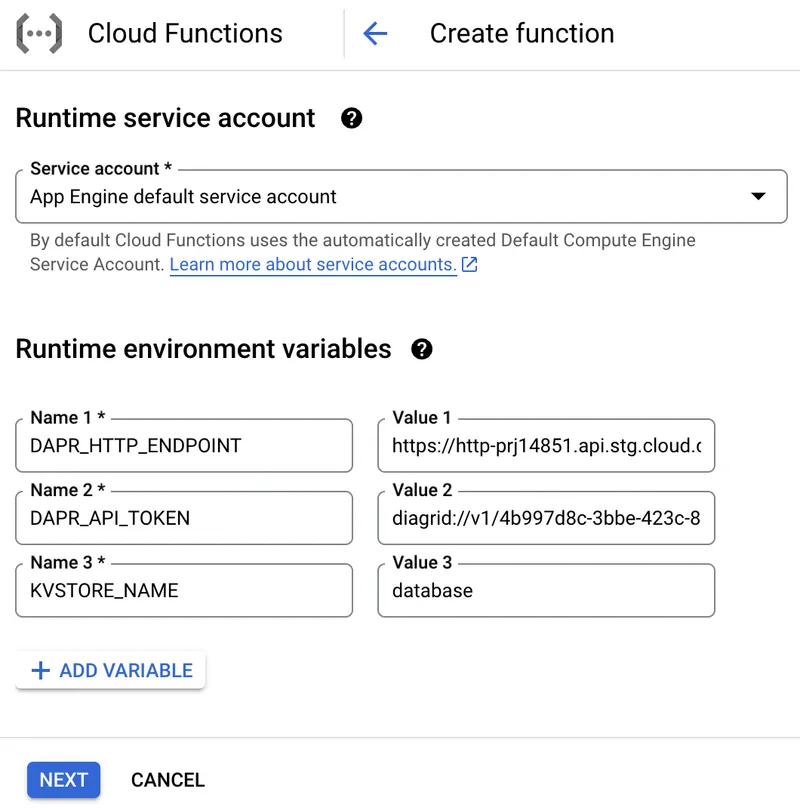
Set Function Runtime environment variables
- Configure Function:
- In the next step, set the Python version to 3.9.
- Copy the main.py and requirements.txt files from the function folder in the GitHub repo into the editor.
- Set the Entry Point to get_recipe_http as that's the name of the method in the Python code.
- Choose Deploy.
- Copy the Google Cloud Function FQDN from the portal.
With these steps, the Python function is ready to be invoked and can store the results back into Catalyst APIs.
Invoke the Function
To trigger an invocation of the newly deployed Google Cloud Function, we need to create a Catalyst Application Connection in the processor App ID. This will allow Catalyst to subscribe the function application to the configured outbox topic and deliver the the events to the function URL.
- Set App Connection:
- On the App IDs page in the Catalyst console, select the processor App ID, and click on Edit Application ID in its right-hand context menu. Set the Callback Application Endpoint value to point to the unique URL of your Google function, and save the configuration.

Set Catalyst callback application endpoint to Function URL
- Subscribe to Outbox Topic:
- Select Pub/Sub Subscriptions, from the left-hand menu and click on Create Subscription.
- Choose a name to the subscription, such as outbox-processor.
- For Pub/Sub Connection, select pubsub.
- For Scopes field, select the App ID processor.
- In the Topic field, enter outbox.
- Set the Default Route to the root path /.
- Choose Create Subscription.
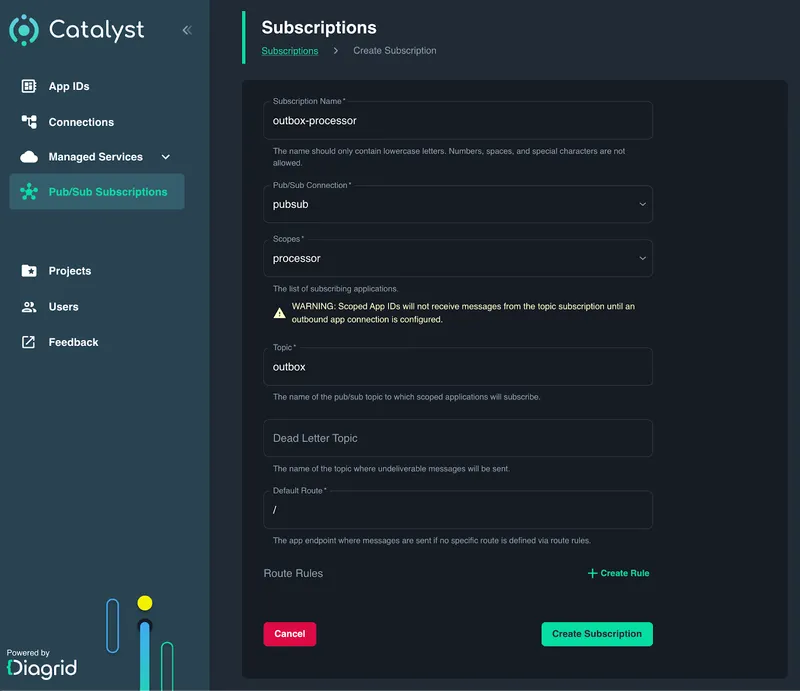
Catalyst create subscription view
Once the App Connection and subscription are created, the App ID should change back to a status of Ready. With these configurations in place, all the pieces have now been connected! You can proceed to validate the functionality of your event-driven architecture.
Run the Application
To run the application, return to Retool and request a new recipe using the form on the top left. This request should be logged in the Requests list on the top right. Subsequently, the request is published to the Catalyst message broker, picked up by the Catalyst processor App ID, and forwarded to the GCP Function. The GCP function then interacts with the Spoonacular Food API to locate a recipe, and upon finding one, communicates with the Catalyst processor App ID to store the result. Both the recipe requests and results are stored in the same Neon database table, distinguished by different attributes. Finally, you can view the fetched recipe by querying Retool's Recipe dashboard.

Retool save request call
To understand how Retool manages the data flow between forms and tables within Catalyst queries, navigate to Retool's Edit App Mode and select the Code view.
In this view, you'll discover that the Request a Recipe form triggers the saveRequest code fragment, initiating an HTTP POST request to the Catalyst resource with the path /v1.0/state/database/transaction. This path ensures the application of the outbox pattern. Within the request body, you'll find the JSON request containing upsert operations.
You can take a similar approach to explore additional code fragments responsible for querying requests, populating tables, or deleting requests and recipes.
If, for any reason, the recipes fail to appear as expected, consider reviewing the Catalyst Logs, Google Function Logs, or using a Neon database browser for further investigation.
You’ve now transformed a CRUD application to a serverless, event-driven application by using the outbox pattern provided by Diagrid Catalyst. Catalyst allows you to transform your applications running in any language on any platform, into scalable, interconnected distributed systems complete with security, resiliency and observability built in.
Do you want to try Catalyst yourself? Sign up for early access today!
Watch a video demo of the above scenario:
Ready to Go to Production?
Add durable execution to your AI agents in minutes. Start free, no credit card required.